
Updating CM5-LTS Firmware for Use With TorqTune2
This guide will explain how to update the CM5-LTS firmware so the unit can be used with the latest TorqTune2 software.
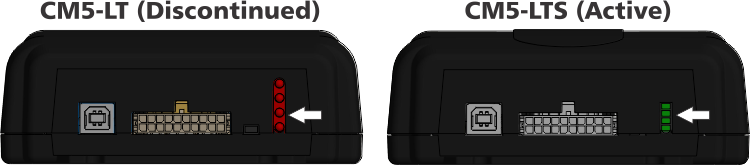
Note: This firmware update can only be performed on current CM5-LTS units with rectangular LEDs. It is not compatible with older CM5-LT units with round LEDs. Some early LTS units were branded LT, so always verify the shape of the LEDs to determine if the unit in question is an LT or an LTS regardless of what is stated on the enclosure.
Step 1: Ensure you are updating the latest WMI controller version CM5-LTS (with rectangular LEDs) and not an older CM5-LT (with round LEDs). Note: Once this update is performed, there is no way to go back to the old firmware / TorqTune without sending the unit back to us.
Step 2: Go to our Support Page (login may be required)

Step 3: Download, Unzip and Install TorqTune2, but don't run it. Note: TorqTune2 only works on Windows machines.

Step 4: Ensure that TorqTune2 is closed. Download and Unzip the CM5-LTS authentication utility.

Step 5: Extract the Authentication Utility to your hard drive. Note: Don't just run it from the temporary browser downloads folder.
Step 6: Connect the controller to the computer using the provided USB cable. Navigate to the folder where the utility was extracted. Right click on the [CM5-LTS_Authenticate] executable and click [Run as administrator].

Step 7: A window like this should appear. Please take a screenshot of this window or copy/paste its contents and email this to us at support AT torqbyte DOT com (obviously change AT to @ and DOT to a period). Close the Authentication Utility.

Step 8: We will email back a ZIP file with a custom CM5-LTS firmware for your controller. It may take up to 48hrs for us to respond. If you don't receive a reply in that time please check your trash or spam folder to make sure our email didn't get filtered out by your email program. Unzip the attachment and save it to your hard drive. Note: the firmware is locked to the specific controller. If you load the provided firmware onto a different controller that controller will become unusable.
Step 9: Connect the CM5-LTS to the computer or laptop with TorqTune2 installed using the provided USB cable. Wait for Windows device plugged in sound or watch the LINK LED on the CM5-LTS to ensure it's ON solid. You can do this at your desk with the unit out of the car since it will be powered from the USB port.
Step 10: Launch TorqTune2.
Step 11: Click the [FW Update] button.

Step 12: Click the [Browse] button and navigate to the folder on your hard drive where the file we emailed you was extracted to. Click OK to select the file and click the [Update Firmware] button. Wait for the 2 green progress bars at the bottom to complete.

Step 13: At this point you will notice the unit's top LED flashing indicating it has the new firmware, but still needs to be configured. To do this, start by clicking the [New] button.

Step 14: This will bring up a prompt asking you to input some basic parameters related to your setup, which sets up the rest of the duty tables, etc. Note: You can just leave these values "as-is" at their default values for the purposes of setting up the unit, but if you want to change any of these later on you will have to create a brand new configuration file from scratch, by clicking the [New] button again. Once you are done editing these fields, click [OK] at the bottom.

Step 15: Click the [Write] button to apply this configuration to the unit. With this the top LED should stop flashing and should be solid ON indicating the CM5-LTS has been properly configured.

Step 16: Each time you want to make configuration changes (assuming the unit is connected via USB and TT2 is running), you should start by clicking [Read] to first import the controller's configuration into TorqTune2. Next step should be to click [SaveAs] and give this configuration a unique name with a date/time so you can always go back to it if the changes you are about to make don't work out. Now you can make changes and periodically click [Write] to apply them to the unit.